0
This write-up from the customer covers it all!:
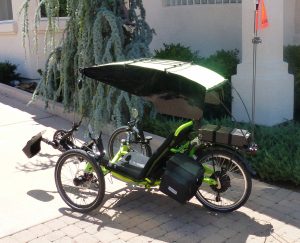 “Hi Doug, I finished the installation of your system this past weekend and would have sent you pictures earlier, but I have been having too much fun riding! Here’s a picture of my ride, an Electric Catrike Trail. BIKE HOIST – The installation was easy and fun. I have a bike hoist in my workshop as shown below that
  allows me to work on the trike in an elevated position. It allows me to easily turn the trike upside down to help with setting up the wheel/motor. DISPLAY – The display was mounted on one of the steering arms
  and can be easily seen from my riding position. The Trail has hand rests as can be observed in the photo. The three button control in the left photo was mounted such that with my hand on the rest, I can easily switch assist levels as needed with my thumb. PAS – The PAS disc was modified to work with my unique crank set and
  works perfectly. To make it work I filled the spaces between the “Comb Fingers” with auto body filler and when it was starting to set up, I used a putty knife to scrap it level with the disc. No sanding needed. I then used an exacto knife to cut a circle based on the tips of the “comb”. Finally a reamer was used to enlarge the hole until it just fit over the shaft. The reed switch was epoxied to the frame.

TORQUE ARM – I installed the torque arm by drilling and tapping a hole to accept a 10-32 machine screw. Makes it easy to fix a flat.
CONTROLLER – When deciding where to mount the controller, the Catrike has a bag sown into the seat so I thought this would be a perfect spot to hide the controller and wiring . After getting the system installed, I took the trike for 4 rides to “break in” the battery. The first two rides went well including going  up a fairly long hill. However, the controller was quite hot. So I put it in one of the mesh pockets on my saddle bag. Checked the controller case when I got home and it was cool. I decided to mount the controller on the mounting brackets for the carrier. I also used a slotted cable cover for the wires coming out of the controller. After a couple long rides with hills, I checked the controller case and it was cool as the proverbial cucumber.
SUMMARY – As you know, I had installed a system from another vendor and unfortunately it was DOA. The vendor agreed the motor was bad and refunded my charges. I wish I had found out about your system before I wasted a lot of time on that system plus time wasted trying to get answers from your competitors up north. I happened to read someone’s review on your product in one of the forums. I decided to give “Doug” a call and the rest is history.
This system is perfect for me. I’m 73 and have had knee surgery. I wasn’t looking to break any speed records although it will zip right along if needed. I typically set the assist to 1 on level roads. The high torque of the geared motor plus my 20” rear tires easily gets me up hills with a 4% grade with an assist of 2 or 3. I’m still getting a good exercise which is the whole idea behind riding the trike. I have lost 2.5 pounds since I’ve received the unit 5 days ago, but some of that is due to putting the system together as opposed to sitting in front of a computer.
BOTTOM LINE – You have a very happy customer. Appreciate your great support and product!

EXTRA NOTE – We all need good data so the canopy makes for a great place to mount accessories like a Garmin Trip Calculator and to the right of that an I-phone with a radar application. This has saved my bacon a couple times.
It’s monsoon season right now and I can tell from the radar when it’s time to call it quits and head home.
Thank you! Walt – Prescott, AZ”